Small Tips and Tricks that Improved My Digital Art Workflow
Disclaimer: These are tips that have helped me improve my art/workflow. These are not rules, just things that took me way too long to figure out that are now second nature to me. Hopefully, this will help another artist along their creative journey!
✦ . ⁺ . ✦ . ⁺ . ✦
One of the advantages with digital art is that you have endless amounts of tools, colors, and materials at your disposal. However, for someone first getting into digital art, this can be daunting, as you may experience choice paralysis, or may not be able to find certain things, as they are buried in menus that you don’t even know exist. There are many preexisting guides that focus on the basics, but after that, I feel like resources for what I would dub an ‘advanced’ beginner are few and far between.
I compiled this guide for those who are beginners in digital art, but also want to improve their workflow, and make their digital workspace a little more manageable. If you know how to make a layer, and how to find a tool to be able to draw on that layer (but not too much else) this guide is for you!!!
I use Clip Studio Paint Pro, so some of these tool may be called something else in your workspace! Most modern digital art programs should have the same/similar function.
-
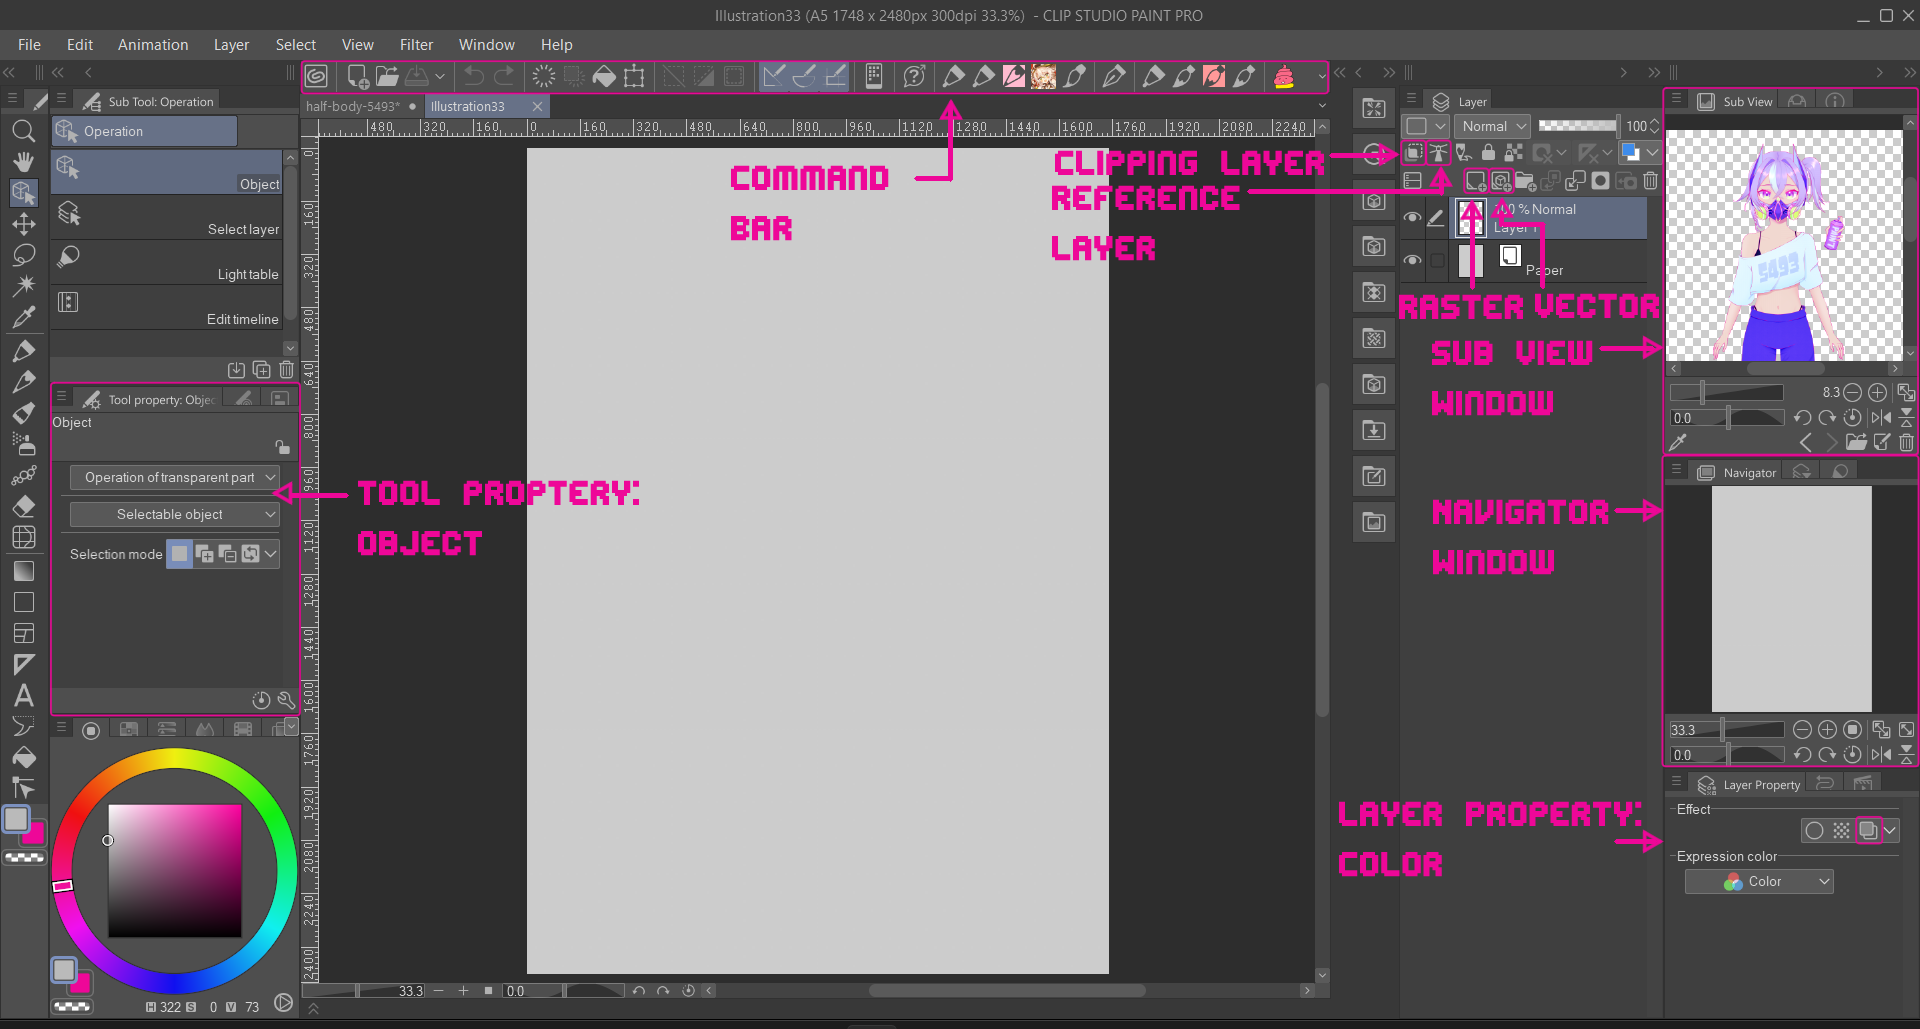
Rearranging your workspace
Once you have drawn a few things in a digital art program, you may notice that there are some tools that you use more, and some that you barely touch. Once you have a general idea of what tools you use regularly (ex. pen tool, lasso tool, eraser tool), you can rearrange the workspace.
To modify your workspace, grab one of the windows. It should be detachable, where you can place it anywhere where a red line appears. You are able to stack different windows on top of each other; this form ‘tabs’ at the top of that section.
If you do not see a certain tool, look under the ‘window’ dropdown in the menu bar. Some of these tools do not appear in the default layout, such as the sub view window, which allows you to upload files into it. I use it upload references, as you are able to color pick from this window. you are also able to upload csp files you are working in, and it updates when you save the file.
I also utilize the command bar, which already has some tools by default loaded into it. I primarily use the fill tool from the command bar, as well as loading brushes into it for quick access. If you’re like me (and love brushes) scrolling though every brush to find the one you were using is quite time consuming. In order to find the brushes I currently use, I drag them from the sub tool menu into the command bar.
-
Learn Hotkeys
I know that a lot of beginner guides may tell you this, but I am grabbing you by the shoulders and shaking you, telling you to learn hotkeys! Yeah, its nice having everything visible that you need, but what about a tool that is stuck under menus and menus? That alone will interrupt your workflow.
To figure out which hotkeys already exist, go to the shortcut settings under the file menu. From there, you can see which hotkeys already exist. If it helps, write down the hotkeys for the tools you will be using the most (P for Pen Tool, E for eraser tool, etc).
Now, instead of having to manually click on the tool to use it, you are able to quickly switch between tools. You can also map your own hotkeys; if you do not like P being Pen, you can change it, as well as assigning hotkeys for tools that do not have one! I used this to be able to map a reset rotation hotkey, as well as one that will flip the canvas.
-
Change your perspective
Some guides may discuss this, but flipping your canvas is actually very helpful. It helps you get a fresh perspective of the canvas, something that is also achievable by taking a break from drawing. However, instead of having to take a break, you can refresh how your eyes perceive it by flipping the canvas. I do often, like every minute or so (in the sketching/line phase) in order to make sure that it looks even. I mapped the hotkeys ‘ctrl + /” to be my hotkey for flipping the canvas. This is why hotkeys are important, as flipping the canvas is something that is buried under menus.
Another thing that is helpful is to have a full view of the canvas. I use the navigator window in order to view my work as a small thumbnail. This helps me see errors in composition, as well as reminding me which way the illustration is facing (i get confused sometimes with how much i flip the canvas).
Another small perspective tip I have is to rotate the canvas. Sometimes certain things are hard to draw when the canvas is upright. Rotating the canvas can help you draw certain curvatures and lines easier. Make sure to map a hotkey to reset the rotation though, as resetting it usually means having to dig through menus.
-
Change up colors!
You may see many digital artist drawing on grey canvases instead of white. this helps with eyestrain, as staring at a pure white canvas for hours is eventually gonna wear your eyes out. It also helps with seeing your colors better, as it is hard to see light colors on a pure white background. I draw on a 20% grey background, but many artists opt for a 50% grey. you can change this by selecting the paper layer, and changing the color of it, or if you want to change the default paper color, there is an option to when creating a new file.
Another function I use is changing the layer color under layer properties. This could be a quick and easy way to color certain parts of a comic/manga, but I use it while drawing in order to manage my layers better. The worst feeling in digital art is discovering that you were drawing on the wrong layer. However, by using the layer properties, you can quickly change the color of a layer. I change the colors of layers I am not working on in order to make sure I am drawing on the correct layer, or if the colors I am drawing with are similar.
-
Learning about Layer types
There are two main types of layers in CSP, raster layers and vector layers. Raster layers are comprised of pixels, and as you draw you are telling the computer to fill in certain pixels with a certain color. Vector layers are layers that are rendered by using mathmatical formulas. Many artists solely use raster layers, and there is nothing wrong with that. I would definintely recommend using them for coloring and shading, as well as sketching. However, for line art (if you do that) I use vector layers.
The main benefit to me about using vector layers is the ease of editing the lines. You can easily erase lines up to an intersection, as well as editing the line with points. Under the tool property:object sub menu, you can also easily change the color of the layer, as well as the brush shape.
Two other ‘types’ of layers are clipping layers and reference layers (idk what they’re officially called but they’re more like designations, as you can set these on both raster and vector layers). If you are a beginner digital artist, clipping layers are going to be your best friend. To make a a layer clip to another, select clip to layer below. A clipping layer essentially refers to the layer below it, and only shows the opaque area that the layer below posesses.
I usually only use reference layers when filling in my lineart. I’m not too sure exactly on what it does, but all I know is that I can set my paint bucket tool to refer to the reference layer, and it only takes into account the lines on that layer, so it is helpful if I want to fill the lineart in, but there is something that would intefere with it if I reffered to all layers.
Digital art can be fun, but also confusing at times since you cannot physically see all of the tools at your disposal. I hope reading though this post helped you think of some new things to integrate into your workflow!
click to enlarge! ↴